PDF Editor - Combine & Join PDF
PDF Editor – Combine & Join PDF is an easy-to-use Windows application that helps you manage PDF files quickly and efficiently.

How to Use PDF Editor – Combine & Join PDF
PDF Editor – Combine & Join PDF is an easy-to-use Windows application that helps you manage PDF files quickly and efficiently. Whether you need to merge documents, split pages, convert images into PDFs, or add watermarks, the app provides all the essential tools in one place.
Getting Started
Launch the application from your Windows desktop or Start menu.
Choose the PDF tool you want to use from the main screen.
Select the files you want to work with.
Complete the task with a few simple clicks and save the final document to your preferred location.
Merge PDF Files
Need to combine multiple PDF documents into one file?
Open the Merge PDF tool.
Click Add Files and select the PDF documents you want to combine.
Arrange the files in your preferred order.
Click Merge.
Choose a save location and create your new PDF.
This feature is ideal for combining reports, assignments, contracts, invoices, and presentations into a single document.
Split PDF Files
If you only need certain pages from a PDF, the Split PDF tool makes it easy.
Open the Split PDF feature.
Select the PDF file you want to split.
Choose specific pages or page ranges to extract.
Click Split.
Save the newly created PDF files.
Use this feature to separate chapters, extract important pages, or create smaller PDF documents from large files.
Convert Images to PDF
Turn photos and images into professional PDF documents.
Open the Image to PDF tool.
Add JPG, PNG, or supported image files.
Arrange the images in the desired order.
Click Convert to PDF.
Save the generated PDF file.
This is perfect for receipts, scanned documents, notes, screenshots, and photo collections.
Add Watermarks to PDFs
Protect and personalize your documents with watermarks.
Select the Add Watermark option.
Open the PDF file you want to edit.
Choose a text watermark or upload an image watermark.
Adjust the position, size, and appearance.
Apply the watermark and save the updated PDF.
Watermarks are useful for branding, ownership identification, signatures, and copyright protection.
Tips for Best Results
Keep files organized before merging for easier document management.
Preview page order before creating a final PDF.
Use watermarks on sensitive or professional documents.
Convert images to PDF for easier sharing and printing.
Save copies of important documents before making changes.
Why Use PDF Editor – Combine & Join PDF?
PDF Editor – Combine & Join PDF provides a simple solution for everyday PDF tasks. Its clean interface, fast performance, and essential PDF management tools help students, professionals, and home users work with documents more efficiently. Whether you are combining files, extracting pages, creating PDFs from images, or adding watermarks, the app makes the process quick and straightforward.
PDF Editor – Combine & Join PDF User Guide
Welcome to PDF Editor – Combine & Join PDF. This application helps you manage PDF documents quickly using four essential tools available directly from the home screen.
Home Screen Overview
When you open the app, you will see four main options:
1. Merge PDF
Use this tool to combine multiple PDF files into a single document.
Best for: Reports, contracts, assignments, invoices, and presentations.
2. Split PDF
Use this tool to extract pages or divide a large PDF into smaller files.
Best for: Extracting chapters, forms, receipts, or important sections from large documents.
3. Image to PDF
Convert image files into a PDF document.
Best for: Scanned documents, photos, receipts, notes, and screenshots.
4. Add Watermark
Add text or image watermarks to protect and personalize your PDF files.
Best for: Branding, copyright protection, document ownership, and signatures.
Tips for Better Results
Review files before merging to ensure the correct order.
Save a backup copy before modifying important documents.
Use watermarks on documents shared externally.
Convert multiple images into a single PDF for easier sharing.
Keep file names organized for quick access later.
Getting Help
All tools are accessible directly from the home screen. Simply click the feature you need and follow the on-screen instructions to complete your task in just a few steps.

Merge PDF – How to Combine Multiple PDF Files
The Merge PDF tool allows you to combine multiple PDF documents into a single file while keeping the pages organized in the order you choose.
Step 1: Open the Merge PDF Tool
From the Home screen, click Merge PDF to open the PDF merging workspace.
Step 2: Add PDF Files
Click Add PDF in the bottom-right corner.
Browse your computer and select one or more PDF files.
The selected files will appear in the Selected Documents panel on the left side.
Step 3: Arrange File Order
Use the Up (▲) and Down (▼) buttons at the bottom-left corner to rearrange the selected documents.
Move a file up to place it earlier in the merged document.
Move a file down to place it later in the merged document.
The final PDF will follow the order shown in the document list.
Step 4: Preview Documents
Select any PDF from the Selected Documents list to view it in the preview panel on the right.
The preview window allows you to:
Navigate through pages
Zoom in or out
Review document content before merging
Verify the correct file order
Step 5: Remove Unwanted Files
If you added a file by mistake:
Select the document from the list.
Click Remove at the bottom-left corner.
The selected file will be removed from the merge list.
Step 6: Merge and Save
Once all documents are added and arranged correctly:
Click Save PDF in the top-right corner.
Choose a location on your computer.
Enter a file name.
Click Save.
The application will create a new PDF containing all selected documents combined into a single file.
Additional Options
Click Print to print the currently selected PDF document directly from the application.
Back
Click Back in the top-left corner to return to the Home screen.
Tips
Review each document in the preview panel before saving.
Arrange files carefully to ensure pages appear in the correct sequence.
Remove duplicate or unnecessary files before creating the final PDF.
Use descriptive file names when saving merged documents for easier organization.
Split PDF – Extract and Save PDF Pages
The Split PDF tool allows you to extract specific pages from a PDF document and save them as a new PDF file. This is useful when you only need certain pages instead of the entire document.
Step 1: Open the Split PDF Tool
From the Home screen, click Split PDF.
Select the PDF file you want to split.
The application will load and display all pages as thumbnails.
Step 2: Review PDF Pages
Once the document is loaded:
Each page appears as a thumbnail in the workspace.
Scroll through the pages to find the sections you want to extract.
Click a page thumbnail to select it.
Step 3: Select Pages
Choose the pages you want to save:
Select Individual Pages
Click on specific page thumbnails to select them.
Multiple pages can be selected.
Select All Pages
Click Select all in the top-right corner to select every page in the document.
Step 4: Remove Unwanted Pages (Optional)
If you selected pages by mistake:
Click the page thumbnail.
Click Delete from the toolbar.
The selected page will be removed from the current selection.
Step 5: Save Selected Pages
To create a new PDF using only the selected pages:
Select the pages you want to extract.
Click Save Selected Pages in the top-right corner.
Choose a destination folder.
Enter a file name.
Click Save.
A new PDF containing only the selected pages will be created.
Step 6: Save All Pages
To save the complete document:
Click Save All Pages.
Choose a save location.
Enter a file name.
Click Save.
The entire PDF will be saved without making page selections.
Additional Options
Back
Click Back in the upper-left corner to return to the previous screen.
Premium Access
Click Premium Access to unlock premium features and export files without trial limitations.
Trial Version Notice
When using the trial version, exported PDF files may include a watermark. Upgrading to the full version removes this limitation and provides access to premium features.
Tips
Review page thumbnails carefully before saving.
Use page selection to create smaller, focused PDF documents.
Save important pages separately for easier sharing.
Verify the page order before exporting the new PDF.
Keep the original PDF as a backup copy.
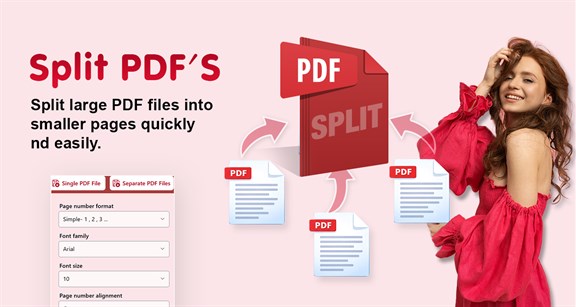
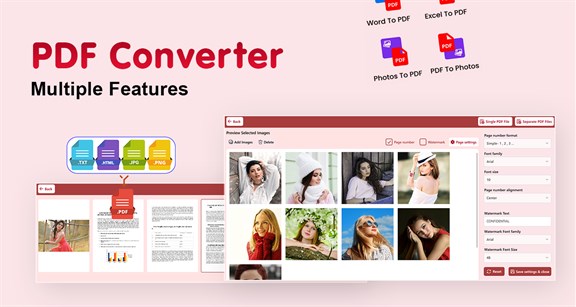
Image to PDF – Convert Images into PDF Documents
The Image to PDF tool allows you to convert one or more image files into PDF documents. You can create a single PDF containing all images or generate separate PDF files for each image.
Step 1: Open the Image to PDF Tool
From the Home screen, click Image to PDF.
The Image to PDF workspace will open.
Step 2: Add Images
Click Add Images in the upper-left corner.
Browse your computer and select one or more image files.
Supported formats include JPG, JPEG, PNG, and other common image types.
The selected images will appear in the preview area.
Step 3: Review Images
Verify that all required images have been added.
Review image previews before creating the PDF.
If an image is not needed, select it and click Delete.
Step 4: Configure PDF Options (Optional)
Add Page Numbers
Enable the Page number checkbox.
Page numbers will be added automatically to the generated PDF document.
Add Watermark
Enable the Watermark checkbox.
Configure the watermark settings if prompted.
The watermark will appear on the PDF pages.
Page Settings
Click Page settings.
Adjust available page layout and formatting options.
Apply the settings before exporting the PDF.
Step 5: Create a Single PDF File
To combine all selected images into one PDF document:
Click Single PDF File in the top-right corner.
Choose a save location.
Enter a file name.
Click Save.
All selected images will be combined into a single PDF file.
Step 6: Create Separate PDF Files
To convert each image into its own PDF document:
Click Separate PDF Files.
Select the destination folder.
Confirm the export.
The application will create an individual PDF file for each image.
Additional Options
Back
Click Back in the upper-left corner to return to the previous screen.
Premium Access
Click Premium Access to unlock premium features and export files without trial limitations.
Trial Version Notice
Files created using the trial version may include a watermark. Upgrading to the premium version removes export restrictions and watermark limitations.
Tips for Best Results
Use high-quality images for clearer PDF output.
Arrange images in the desired order before creating a single PDF.
Review page settings before exporting.
Enable page numbers for multi-page documents.
Keep original image files as backups for future editing.
With the Image to PDF tool, you can quickly transform photos, scanned documents, receipts, screenshots, and notes into professional PDF files for sharing, printing, and archiving.

Add Watermark – Protect and Personalize Your PDF
The Add Watermark tool allows you to add custom text or image watermarks to PDF documents. You can also insert page numbers and customize their appearance before saving the final PDF.
Step 1: Open the Add Watermark Tool
From the Home screen, click Add Watermark.
Select the PDF document you want to edit.
The PDF will open in the preview panel on the right side of the screen.
Step 2: Choose a Watermark Type
You can add either a text watermark or an image watermark.
Text Watermark
Select Watermark Text.
Enter your desired watermark text in the Write watermark text field.
Example: CONFIDENTIAL, DRAFT, SAMPLE, INTERNAL USE
Customize the watermark:
Select a Font Family
Choose a Font Size
Pick a Watermark Color
Review the watermark in the PDF preview.
Step 3: Add an Image Watermark
Select Watermark Image.
Click Add Image.
Browse and select an image file from your computer.
The image watermark will be applied to the PDF preview.
Adjust settings if available and review the placement.
This option is useful for:
Company logos
Brand marks
Signatures
Copyright notices
Step 4: Add Page Numbers (Optional)
To include page numbers in your PDF:
Enable Insert page number.
Select a Page Number Format.
Example: 1, 2, 3…
Choose a Font Family.
Select a Font Size.
Choose the Page Number Alignment.
Left
Center
Right
The page numbering will appear in the preview automatically.
Step 5: Review the PDF
Use the preview panel on the right to verify:
Watermark text or image appearance
Font style and size
Watermark color
Watermark position
Page numbering format and placement
Make any necessary adjustments before saving.
Step 6: Create the Watermarked PDF
Once you are satisfied with the settings:
Click Add Watermark & Create PDF.
Choose a save location.
Enter a file name.
Click Save.
A new PDF containing the watermark and optional page numbers will be created.
Additional Options
Open Another PDF
Click Open Another PDF to load a different document without returning to the Home screen.
Click Print to print the currently displayed PDF document.
Save PDF
Click Save PDF to save the edited document.
Reset
Click Reset to restore the default watermark and page number settings.
Remove Watermark
Click Remove Watermark to remove trial-version watermarks and access premium features.
Trial Version Notice
Documents created using the trial version may include a watermark. Upgrading to the premium version removes trial watermarks and unlocks additional features.
Tips for Best Results
Use clear, readable watermark text.
Keep watermark opacity subtle so document content remains visible.
Use image watermarks for company branding and logos.
Preview all pages before saving.
Add page numbers to improve document organization and navigation.
The Add Watermark tool helps secure, brand, and personalize your PDF documents while maintaining a professional appearance.